SFC / SNES · JAPAN VERSION

Choose your next catch.

Find a fish, choose compatible tackle, and see where to go.

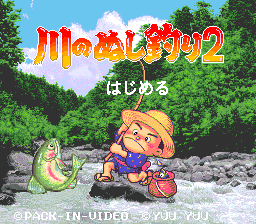
Kawa no Nushi Tsuri 2 Japanese SNES title screen
Original Japanese title screen · 川のぬし釣り2

THE FULL INDEX

Rods

Choose a fishing style, then compare time to aim and line strength.

Choices for this category · 4 sections

Float rods: pick the rod by the fish

Big fish need a rod with a long line; small fish take any rod. Buy by the fish:
• 38 species (e.g. Amemasu, Iwana, Ugui) need line strength ×3 or more: Yamabe rod 3.9 m (¥350, areas 1, 2, 4, 6); if you can wait until area 4, Hera rod 3 m (¥200) is cheaper
• 9 species (e.g. Maruta, Haze, Hasu) need line strength ×9–12 or more: Ayu carbon rod 10 m (¥1,500, areas 3, 4, 6); if you can wait until area 4, Hera rod 3 m (¥200) is cheaper
• 10 species (e.g. Raigyo, Brown trout, Namazu) need line strength ×15 or more: Ayu carbon rod 10 m (¥1,500, areas 3, 4, 6)
• 15 species (e.g. Oo-unagi, Kokuren, Akame) need line strength ×24 or more: Hera carbon rod 6.5 m (¥2,000, areas 4, 5, 6); if you can wait until area 5, Carp rod 5 m (¥1,500) is cheaper

Line strength ×N is how far a fish may run before the line breaks and the hook is lost; big fish are decided here (the giant eel needs ×24). The rod also sets where the fight meter starts, which is how many mistakes you can afford: Bitterling rod 2 m gives the best start against fish up to 15 cm; most of the other rods give the best start against fish of 16–35 cm; for fish over 35 cm almost any rod is the same; using Carp rod 5 m on small and mid-size fish loses 1.5 mistakes on average, so keep it for fish over 35 cm.

Never sold anywhere: Mountain stream carbon rod 6 m or Mabuna rod 3.3 m. Only sold by the special rod seller: Bitterling rod 2 m or Carp rod 5 m.

Lure rods: pick the rod by the fish

Big fish need a rod with a long line; small fish take any rod. Buy by the fish:
• 27 species (e.g. Raigyo, Brown trout, Namazu) need line strength ×3–15 or more: the small lure rod (¥500, areas 1, 2, 3, 5, 6)
• 11 species (e.g. Oo-unagi, Kokuren, Akame) need line strength ×24 or more: the heavy-fish lure rod (¥650, area 4)

Line strength ×N is how far a fish may run before the line breaks and the hook is lost; big fish are decided here (the giant eel needs ×24). The rod also sets where the fight meter starts, which is how many mistakes you can afford: the small lure rod gives the best start against fish up to 15 cm; the large lure rod gives the best start against fish of 16–35 cm; for fish over 35 cm almost any rod is the same; using the heavy-fish lure rod on small and mid-size fish loses 1.0 mistakes on average, so keep it for fish over 35 cm.

Never sold anywhere: the medium lure rod. Only sold by the special rod seller: the heavy-fish lure rod. Casting and lure rods give you less time to aim below 100 HP; restore HP before you fish.

Casting rods: pick the rod by the fish

Big fish need a rod with a long line; small fish take any rod. Buy by the fish:
• 25 species (e.g. Raigyo, Namazu, Numagarei) need line strength ×18 or more: the small casting rod (¥250, areas 1, 3, 4, 5, 6)
• 1 species (e.g. Kamuruchi) need line strength ×21 or more: the medium casting rod (¥600, areas 2, 4, 5, 6)
• 4 species (e.g. Oo-unagi, Aouo, Unagi) need line strength ×24 or more: the two-handed casting rod (¥1,500, area 6)

Line strength ×N is how far a fish may run before the line breaks and the hook is lost; big fish are decided here (the giant eel needs ×24). The rod also sets where the fight meter starts, which is how many mistakes you can afford: the small casting rod gives the best start against fish up to 15 cm; the medium casting rod gives the best start against fish of 16–35 cm; for fish over 35 cm almost any rod is the same; using the two-handed casting rod on small and mid-size fish loses 1.4 mistakes on average, so keep it for fish over 35 cm.

Only sold by the special rod seller: the two-handed casting rod. Casting and lure rods give you less time to aim below 100 HP; restore HP before you fish.

Fly rods: pick the rod by the fish

Big fish need a rod with a long line; small fish take any rod. Buy by the fish:
• 30 species (e.g. Brown trout, Amemasu, Sakuramasu) need line strength ×3–15 or more: the medium fly rod (¥400, areas 1, 2, 3, 5)
• 3 species (e.g. Aouo, Black bass, Nijimasu (rainbow trout)) want line strength ×24, but the longest rod is the large fly rod (¥450, areas 1, 2, 3, 4) (×21); it works, with some risk of the line breaking

Line strength ×N is how far a fish may run before the line breaks and the hook is lost; big fish are decided here. The rod also sets where the fight meter starts, which is how many mistakes you can afford: the medium fly rod gives the best start against fish of 16–35 cm; for fish over 35 cm almost any rod is the same; using the large fly rod on small and mid-size fish loses 1.7 mistakes on average, so keep it for fish over 35 cm.

Never sold anywhere: the small fly rod.
Compare rods within a fishing style · 21

More aim time lets you move the target longer. A higher line strength means the fish can pull farther before tackle is lost. The numbers are only for comparing rods, not metres or power. Fish can still escape other ways.

ItemFishing styleTime to aimLine strengthPurchase priceRecommendation
Carp rod, 8-piece, 5 mFloat / Ayu4024¥1500For big fish: line strength ×24 is long enough for every species; best start against 23 species; worse against fish up to 15 cm and fish of 16–35 cm (46 species)See purchase conditions and alternatives ↗
Hera carbon rod, 6.5 mFloat / Ayu6024¥2000For big fish: line strength ×24 is long enough for every species; best start against 43 species; worse against fish up to 15 cm (23 species)See purchase conditions and alternatives ↗
Ayu carbon rod, 10 mFloat / Ayu8015¥1500For fish that line strength ×15 holds (57 of 72 species); best start against 42 species; worse against fish up to 15 cm (23 species)See purchase conditions and alternatives ↗
Hera rod, 3-piece, 3 mFloat / Ayu3012¥200For fish that line strength ×12 holds (47 of 72 species); best start against 43 species; worse against fish up to 15 cm (23 species)See purchase conditions and alternatives ↗
Ayu rod, 6-piece, 7 mFloat / Ayu709¥1500Skip: Ayu carbon rod 10 m costs the same, has a line that breaks less easily and gives more time to aim (sold in areas 3, 4, 6)See purchase conditions and alternatives ↗
Mountain stream carbon rod, 6 mFloat / Ayu608No recorded shop stockNot sold anywhere; if you own it: best start against 43 species; worse against fish up to 15 cm (22 species)See purchase conditions and alternatives ↗
Clear stream carbon rod, 5.3 mFloat / Ayu507¥500For fish that line strength ×7 holds (38 of 72 species); best start against 42 species; worse against fish up to 15 cm (23 species)See purchase conditions and alternatives ↗
Yamame rod, 8-piece, 4.5 mFloat / Ayu406¥750Skip: Clear stream carbon rod 5.3 m costs less, has a line that breaks less easily and gives more time to aim (sold in areas 1, 2, 3, 5, 6)See purchase conditions and alternatives ↗
Yamabe rod, 6-piece, 3.9 mFloat / Ayu305¥350Only buy before you reach area 4: from there Hera rod 3 m costs less and has a line that breaks less easilySee purchase conditions and alternatives ↗
Mabuna rod, 9-piece, 3.3 mFloat / Ayu204No recorded shop stockNot sold anywhere; if you own it: best start against 57 species; worse against fish of 16–35 cm and fish over 35 cm (8 species)See purchase conditions and alternatives ↗
Bitterling rod, 10-piece, 2 mFloat / Ayu103¥500For fish that line strength ×3 holds (38 of 72 species); best start against 56 species; worse against fish of 16–35 cm (9 species)See purchase conditions and alternatives ↗
Two-handed casting rodCasting12024¥1500For big fish: line strength ×24 is long enough for every species; best start against 10 species; worse against fish up to 15 cm and fish of 16–35 cm (19 species)See purchase conditions and alternatives ↗
Medium casting rodCasting10021¥600For fish that line strength ×21 holds (26 of 30 species); best start against 18 species; worse against fish up to 15 cm (9 species)See purchase conditions and alternatives ↗
Small casting rodCasting7018¥250For fish that line strength ×18 holds (25 of 30 species); best start against 24 species; worse against fish of 16–35 cm (3 species)See purchase conditions and alternatives ↗
Heavy-fish lure rodLure12024¥650For big fish: line strength ×24 is long enough for every species; best start against 19 species; worse against fish up to 15 cm and fish of 16–35 cm (16 species)See purchase conditions and alternatives ↗
Large lure rodLure10021¥600For fish that line strength ×21 holds (27 of 38 species); best start against 32 species; worse against fish up to 15 cm (4 species)See purchase conditions and alternatives ↗
Medium lure rodLure8018No recorded shop stockNot sold anywhere; if you own it: best start against 34 species; worse against fish of 16–35 cm and fish over 35 cm (2 species)See purchase conditions and alternatives ↗
Small lure rodLure7015¥500For fish that line strength ×15 holds (27 of 38 species); best start against 34 species; worse against fish of 16–35 cm and fish over 35 cm (2 species)See purchase conditions and alternatives ↗
Large fly rodFly7021¥450For fish that line strength ×21 holds (30 of 33 species); best start against 9 species; worse against fish up to 15 cm and fish of 16–35 cm (22 species)See purchase conditions and alternatives ↗
Medium fly rodFly6018¥400For fish that line strength ×18 holds (30 of 33 species); best start against 20 species; worse against fish up to 15 cm (10 species)See purchase conditions and alternatives ↗
Small fly rodFly5015No recorded shop stockNot sold anywhere; if you own it: best start against 25 species; worse against fish of 16–35 cm (4 species)See purchase conditions and alternatives ↗

21 entries shown

Bitterling rod, 10-piece, 2 m
Fishing rods

Bitterling rod, 10-piece, 2 m

¥500ID 01
Open item details ↗

When should I choose this rod?

For fish that line strength ×3 holds (38 of 72 species); best start against 56 species; worse against fish of 16–35 cm (9 species)

Why and what to compare
Full recommendation

Line strength ×3 is how far a fish can run before the line breaks and the hook is lost. This rod holds 38 of 72 species; the other 34 species (e.g. Oo-unagi, Kokuren, Akame) run farther, so they need a longer rod. It gives the best fight start against 56 of 72 species but is worse against fish of 16–35 cm (9 species, e.g. Yamame, Mabuna, Sayori); averaged over all species it costs 0.2 mistakes you could otherwise afford. Price ¥500; sold in area 5 (special rod seller). For fish this line cannot hold, use Hera rod 3 m (¥200, areas 4, 5) or Carp rod 5 m (¥1,500, area 5). If you already own this rod, keep using it.

The numbers come from simulated fights: the rod sets the fight meter's starting point, which decides how many mistakes you can afford. This rod costs 0.2 mistakes per species on average (the best rod costs 0). Line strength decides how far a fish may run before the line breaks.

Where to buy

Special rod merchant in town · Area 5 ↗

Technical evidence

Explanation source: rom_trace

data/gear-effects.json ↗

docs/gear-effects.md ↗

docs/fight-model.md ↗

scripts/build_gear_advice.py ↗

Fish this item is matched to (its fight start is adjusted when you fish for them): Tanago

A float rod: line strength ×3 holds 38 of 72 species, and it gives the best fight start against 56 of them.

  • Line strength ×3 holds 38 of 72 species. The other 34 species (e.g. Oo-unagi, Kokuren, Akame) run farther than that, so the line breaks and the hook is lost; they need a longer rod.
  • Fight start by fish size: this rod is best for 56 of 72 species and costs 0.2 mistakes on average.
  • This rod is matched to Tanago: when you fish for it, the rod skips the size adjustment.

Within Float / Ayu rods: time to aim ranks 11/11 at full HP; line strength ranks 11/11. Rank 1 is longest/highest in that dimension.

ROM price field: ¥500

  • At 100 HP the automatic aim cutoff is 10 counter ticks. The line range is 1008 internal position units (3 × 336), not meters: the game uses it to decide whether the fish was dragged past the line.
  • The fight meter's start is computed by the routine at 04:8D2A..8EC1 from the rod's class (selector 0), the fish's size and a matching fish ID. The measured effect is in docs/gear-effects.md.

File offset: 0x02A7F5

Raw bytes: 01 00 0A 03 39 00 08 00 51 A9 F4 01

Decoded fields

Rod style code
1
Cast/aim hold-time cutoff
10
Reach multiplier
3
Reach threshold (internal units)
1008
Fish-ID comparison code
57
Fight-response branch selector
0
Open full game-screen capture ↗
Mountain stream carbon rod, 6 m
Fishing rods

Mountain stream carbon rod, 6 m

ID 02
Open item details ↗

When should I choose this rod?

Not sold anywhere; if you own it: best start against 43 species; worse against fish up to 15 cm (22 species)

Why and what to compare
Full recommendation

Line strength ×8 is how far a fish can run before the line breaks and the hook is lost. This rod holds 38 of 72 species; the other 34 species (e.g. Oo-unagi, Kokuren, Akame) run farther, so they need a longer rod. It gives the best fight start against 43 of 72 species but is worse against fish up to 15 cm (22 species, e.g. Wakasagi, Mugitsuku, Akaza); averaged over all species it costs 0.4 mistakes you could otherwise afford. It is not sold in any of the six areas. For fish this line cannot hold, use Hera rod 3 m (¥200, areas 4, 5) or Carp rod 5 m (¥1,500, area 5). If you already own this rod, keep using it.

The numbers come from simulated fights: the rod sets the fight meter's starting point, which decides how many mistakes you can afford. This rod costs 0.4 mistakes per species on average (the best rod costs 0). Line strength decides how far a fish may run before the line breaks.

Where to buy

This ID is absent from the decoded stocks of all six area shops, so no purchase location is listed for this record.

Technical evidence

Explanation source: rom_trace

data/gear-effects.json ↗

docs/gear-effects.md ↗

docs/fight-model.md ↗

scripts/build_gear_advice.py ↗

Fish this item is matched to (its fight start is adjusted when you fish for them): Iwana

A float rod: line strength ×8 holds 38 of 72 species, and it gives the best fight start against 43 of them.

  • Line strength ×8 holds 38 of 72 species. The other 34 species (e.g. Oo-unagi, Kokuren, Akame) run farther than that, so the line breaks and the hook is lost; they need a longer rod.
  • Fight start by fish size: this rod is best for 43 of 72 species and costs 0.4 mistakes on average.
  • This rod is matched to Iwana: when you fish for it, the rod skips the size adjustment.

Within Float / Ayu rods: time to aim ranks 3/11 at full HP; line strength ranks 6/11. Rank 1 is longest/highest in that dimension.

ROM price field: ¥500

  • At 100 HP the automatic aim cutoff is 60 counter ticks. The line range is 2688 internal position units (8 × 336), not meters: the game uses it to decide whether the fish was dragged past the line.
  • The fight meter's start is computed by the routine at 04:8D2A..8EC1 from the rod's class (selector 1), the fish's size and a matching fish ID. The measured effect is in docs/gear-effects.md.

File offset: 0x02A801

Raw bytes: 01 02 3C 08 01 09 0E 01 5F A9 F4 01

Decoded fields

Rod style code
1
Cast/aim hold-time cutoff
60
Reach multiplier
8
Reach threshold (internal units)
2688
Fish-ID comparison code
1
Fight-response branch selector
1
Open full game-screen capture ↗
Yamabe rod, 6-piece, 3.9 m
Fishing rods

Yamabe rod, 6-piece, 3.9 m

¥350ID 03
Open item details ↗

When should I choose this rod?

Only buy before you reach area 4: from there Hera rod 3 m costs less and has a line that breaks less easily

Why and what to compare
Full recommendation

Line strength ×5 is how far a fish can run before the line breaks and the hook is lost. This rod holds 38 of 72 species; the other 34 species (e.g. Oo-unagi, Kokuren, Akame) run farther, so they need a longer rod. It gives the best fight start against 42 of 72 species but is worse against fish up to 15 cm (23 species, e.g. Wakasagi, Mugitsuku, Akaza); averaged over all species it costs 0.4 mistakes you could otherwise afford. Price ¥350; sold in areas 1, 2, 4, 6. Once you reach area 4, buy Hera rod 3 m instead: it costs less and has a line that breaks less easily. If you already own this rod, keep using it.

The numbers come from simulated fights: the rod sets the fight meter's starting point, which decides how many mistakes you can afford. This rod costs 0.4 mistakes per species on average (the best rod costs 0). Line strength decides how far a fish may run before the line breaks.

Where to buy
Technical evidence

Explanation source: rom_trace

data/gear-effects.json ↗

docs/gear-effects.md ↗

docs/fight-model.md ↗

scripts/build_gear_advice.py ↗

A float rod: line strength ×5 holds 38 of 72 species, and it gives the best fight start against 42 of them.

  • Line strength ×5 holds 38 of 72 species. The other 34 species (e.g. Oo-unagi, Kokuren, Akame) run farther than that, so the line breaks and the hook is lost; they need a longer rod.
  • Fight start by fish size: this rod is best for 42 of 72 species and costs 0.4 mistakes on average.

Within Float / Ayu rods: time to aim ranks 8/11 at full HP; line strength ranks 9/11. Rank 1 is longest/highest in that dimension.

ROM price field: ¥350

  • At 100 HP the automatic aim cutoff is 30 counter ticks. The line range is 1680 internal position units (5 × 336), not meters: the game uses it to decide whether the fish was dragged past the line.
  • The fight meter's start is computed by the routine at 04:8D2A..8EC1 from the rod's class (selector 1), the fish's size and a matching fish ID. The measured effect is in docs/gear-effects.md.

File offset: 0x02A80D

Raw bytes: 01 00 1E 05 00 06 08 01 6C A9 5E 01

Decoded fields

Rod style code
1
Cast/aim hold-time cutoff
30
Reach multiplier
5
Reach threshold (internal units)
1680
Fish-ID comparison code
0
Fight-response branch selector
1
Open full game-screen capture ↗
Clear stream carbon rod, 5.3 m
Fishing rods

Clear stream carbon rod, 5.3 m

¥500ID 04
Open item details ↗

When should I choose this rod?

For fish that line strength ×7 holds (38 of 72 species); best start against 42 species; worse against fish up to 15 cm (23 species)

Why and what to compare
Full recommendation

Line strength ×7 is how far a fish can run before the line breaks and the hook is lost. This rod holds 38 of 72 species; the other 34 species (e.g. Oo-unagi, Kokuren, Akame) run farther, so they need a longer rod. It gives the best fight start against 42 of 72 species but is worse against fish up to 15 cm (23 species, e.g. Wakasagi, Mugitsuku, Akaza); averaged over all species it costs 0.4 mistakes you could otherwise afford. Price ¥500; sold in areas 1, 2, 3, 5, 6. For fish this line cannot hold, use Hera rod 3 m (¥200, areas 4, 5) or Carp rod 5 m (¥1,500, area 5). If you already own this rod, keep using it.

The numbers come from simulated fights: the rod sets the fight meter's starting point, which decides how many mistakes you can afford. This rod costs 0.4 mistakes per species on average (the best rod costs 0). Line strength decides how far a fish may run before the line breaks.

Where to buy
Technical evidence

Explanation source: rom_trace

data/gear-effects.json ↗

docs/gear-effects.md ↗

docs/fight-model.md ↗

scripts/build_gear_advice.py ↗

A float rod: line strength ×7 holds 38 of 72 species, and it gives the best fight start against 42 of them.

  • Line strength ×7 holds 38 of 72 species. The other 34 species (e.g. Oo-unagi, Kokuren, Akame) run farther than that, so the line breaks and the hook is lost; they need a longer rod.
  • Fight start by fish size: this rod is best for 42 of 72 species and costs 0.4 mistakes on average.

Within Float / Ayu rods: time to aim ranks 5/11 at full HP; line strength ranks 7/11. Rank 1 is longest/highest in that dimension.

ROM price field: ¥500

  • At 100 HP the automatic aim cutoff is 50 counter ticks. The line range is 2352 internal position units (7 × 336), not meters: the game uses it to decide whether the fish was dragged past the line.
  • The fight meter's start is computed by the routine at 04:8D2A..8EC1 from the rod's class (selector 1), the fish's size and a matching fish ID. The measured effect is in docs/gear-effects.md.

File offset: 0x02A819

Raw bytes: 01 02 32 07 00 0A 0E 01 7B A9 F4 01

Decoded fields

Rod style code
1
Cast/aim hold-time cutoff
50
Reach multiplier
7
Reach threshold (internal units)
2352
Fish-ID comparison code
0
Fight-response branch selector
1
Open full game-screen capture ↗
Yamame rod, 8-piece, 4.5 m
Fishing rods

Yamame rod, 8-piece, 4.5 m

¥750ID 05
Open item details ↗

When should I choose this rod?

Skip: Clear stream carbon rod 5.3 m costs less, has a line that breaks less easily and gives more time to aim (sold in areas 1, 2, 3, 5, 6)

Why and what to compare
Full recommendation

Line strength ×6 is how far a fish can run before the line breaks and the hook is lost. This rod holds 38 of 72 species; the other 34 species (e.g. Oo-unagi, Kokuren, Akame) run farther, so they need a longer rod. It gives the best fight start against 42 of 72 species but is worse against fish up to 15 cm (23 species, e.g. Wakasagi, Mugitsuku, Akaza); averaged over all species it costs 0.4 mistakes you could otherwise afford. Price ¥750; sold in areas 1, 2. Once you reach area 1, buy Clear stream carbon rod 5.3 m instead: it costs less, has a line that breaks less easily and gives more time to aim. If you already own this rod, keep using it.

The numbers come from simulated fights: the rod sets the fight meter's starting point, which decides how many mistakes you can afford. This rod costs 0.4 mistakes per species on average (the best rod costs 0). Line strength decides how far a fish may run before the line breaks.

Where to buy

Town shop · Area 1 ↗ · Area 2 ↗

Technical evidence

Explanation source: rom_trace

data/gear-effects.json ↗

docs/gear-effects.md ↗

docs/fight-model.md ↗

scripts/build_gear_advice.py ↗

Fish this item is matched to (its fight start is adjusted when you fish for them): Yamame

A float rod: line strength ×6 holds 38 of 72 species, and it gives the best fight start against 42 of them.

  • Line strength ×6 holds 38 of 72 species. The other 34 species (e.g. Oo-unagi, Kokuren, Akame) run farther than that, so the line breaks and the hook is lost; they need a longer rod.
  • Fight start by fish size: this rod is best for 42 of 72 species and costs 0.4 mistakes on average.
  • This rod is matched to Yamame: when you fish for it, the rod skips the size adjustment.

Within Float / Ayu rods: time to aim ranks 6/11 at full HP; line strength ranks 8/11. Rank 1 is longest/highest in that dimension.

ROM price field: ¥750

  • At 100 HP the automatic aim cutoff is 40 counter ticks. The line range is 2016 internal position units (6 × 336), not meters: the game uses it to decide whether the fish was dragged past the line.
  • The fight meter's start is computed by the routine at 04:8D2A..8EC1 from the rod's class (selector 1), the fish's size and a matching fish ID. The measured effect is in docs/gear-effects.md.

File offset: 0x02A825

Raw bytes: 01 00 28 06 03 02 08 01 8A A9 EE 02

Decoded fields

Rod style code
1
Cast/aim hold-time cutoff
40
Reach multiplier
6
Reach threshold (internal units)
2016
Fish-ID comparison code
3
Fight-response branch selector
1
Open full game-screen capture ↗
Mabuna rod, 9-piece, 3.3 m
Fishing rods

Mabuna rod, 9-piece, 3.3 m

ID 06
Open item details ↗

When should I choose this rod?

Not sold anywhere; if you own it: best start against 57 species; worse against fish of 16–35 cm and fish over 35 cm (8 species)

Why and what to compare
Full recommendation

Line strength ×4 is how far a fish can run before the line breaks and the hook is lost. This rod holds 38 of 72 species; the other 34 species (e.g. Oo-unagi, Kokuren, Akame) run farther, so they need a longer rod. It gives the best fight start against 57 of 72 species but is worse against fish of 16–35 cm and fish over 35 cm (8 species, e.g. Iwana, Ugui, Yamame); averaged over all species it costs 0.2 mistakes you could otherwise afford. It is not sold in any of the six areas. For fish this line cannot hold, use Hera rod 3 m (¥200, areas 4, 5) or Carp rod 5 m (¥1,500, area 5). If you already own this rod, keep using it.

The numbers come from simulated fights: the rod sets the fight meter's starting point, which decides how many mistakes you can afford. This rod costs 0.2 mistakes per species on average (the best rod costs 0). Line strength decides how far a fish may run before the line breaks.

Where to buy

This ID is absent from the decoded stocks of all six area shops, so no purchase location is listed for this record.

Technical evidence

Explanation source: rom_trace

data/gear-effects.json ↗

docs/gear-effects.md ↗

docs/fight-model.md ↗

scripts/build_gear_advice.py ↗

Fish this item is matched to (its fight start is adjusted when you fish for them): Mabuna

A float rod: line strength ×4 holds 38 of 72 species, and it gives the best fight start against 57 of them.

  • Line strength ×4 holds 38 of 72 species. The other 34 species (e.g. Oo-unagi, Kokuren, Akame) run farther than that, so the line breaks and the hook is lost; they need a longer rod.
  • Fight start by fish size: this rod is best for 57 of 72 species and costs 0.2 mistakes on average.
  • This rod is matched to Mabuna: when you fish for it, the rod skips the size adjustment.

Within Float / Ayu rods: time to aim ranks 10/11 at full HP; line strength ranks 10/11. Rank 1 is longest/highest in that dimension.

ROM price field: ¥100

  • At 100 HP the automatic aim cutoff is 20 counter ticks. The line range is 1344 internal position units (4 × 336), not meters: the game uses it to decide whether the fish was dragged past the line.
  • The fight meter's start is computed by the routine at 04:8D2A..8EC1 from the rod's class (selector 0), the fish's size and a matching fish ID. The measured effect is in docs/gear-effects.md.

File offset: 0x02A831

Raw bytes: 01 00 14 04 1D 03 08 00 99 A9 64 00

Decoded fields

Rod style code
1
Cast/aim hold-time cutoff
20
Reach multiplier
4
Reach threshold (internal units)
1344
Fish-ID comparison code
29
Fight-response branch selector
0
Open full game-screen capture ↗
Ayu rod, 6-piece, 7 m
Fishing rods

Ayu rod, 6-piece, 7 m

¥1500ID 07
Open item details ↗

When should I choose this rod?

Skip: Ayu carbon rod 10 m costs the same, has a line that breaks less easily and gives more time to aim (sold in areas 3, 4, 6)

Why and what to compare
Full recommendation

Line strength ×9 is how far a fish can run before the line breaks and the hook is lost. This rod holds 44 of 72 species; the other 28 species (e.g. Oo-unagi, Kokuren, Akame) run farther, so they need a longer rod. It gives the best fight start against 42 of 72 species but is worse against fish up to 15 cm (23 species, e.g. Wakasagi, Mugitsuku, Akaza); averaged over all species it costs 0.4 mistakes you could otherwise afford. Price ¥1,500; sold in areas 3, 5. Once you reach area 3, buy Ayu carbon rod 10 m instead: it costs the same, has a line that breaks less easily and gives more time to aim. If you already own this rod, keep using it.

The numbers come from simulated fights: the rod sets the fight meter's starting point, which decides how many mistakes you can afford. This rod costs 0.4 mistakes per species on average (the best rod costs 0). Line strength decides how far a fish may run before the line breaks.

Where to buy

Town shop · Area 3 ↗ · Area 5 ↗

Technical evidence

Explanation source: rom_trace

data/gear-effects.json ↗

docs/gear-effects.md ↗

docs/fight-model.md ↗

scripts/build_gear_advice.py ↗

Fish this item is matched to (its fight start is adjusted when you fish for them): Ayu

A float rod: line strength ×9 holds 44 of 72 species, and it gives the best fight start against 42 of them.

  • Line strength ×9 holds 44 of 72 species. The other 28 species (e.g. Oo-unagi, Kokuren, Akame) run farther than that, so the line breaks and the hook is lost; they need a longer rod.
  • Fight start by fish size: this rod is best for 42 of 72 species and costs 0.4 mistakes on average.
  • This rod is matched to Ayu: when you fish for it, the rod skips the size adjustment.

Within Float / Ayu rods: time to aim ranks 2/11 at full HP; line strength ranks 5/11. Rank 1 is longest/highest in that dimension.

ROM price field: ¥1500

  • At 100 HP the automatic aim cutoff is 70 counter ticks. The line range is 3024 internal position units (9 × 336), not meters: the game uses it to decide whether the fish was dragged past the line.
  • The fight meter's start is computed by the routine at 04:8D2A..8EC1 from the rod's class (selector 1), the fish's size and a matching fish ID. The measured effect is in docs/gear-effects.md.

File offset: 0x02A83D

Raw bytes: 01 00 46 09 38 01 08 01 A8 A9 DC 05

Decoded fields

Rod style code
1
Cast/aim hold-time cutoff
70
Reach multiplier
9
Reach threshold (internal units)
3024
Fish-ID comparison code
56
Fight-response branch selector
1
Open full game-screen capture ↗
Carp rod, 8-piece, 5 m
Fishing rods

Carp rod, 8-piece, 5 m

¥1500ID 08
Open item details ↗

When should I choose this rod?

For big fish: line strength ×24 is long enough for every species; best start against 23 species; worse against fish up to 15 cm and fish of 16–35 cm (46 species)

Why and what to compare
Full recommendation

Line strength ×24 is how far a fish can run before the line breaks and the hook is lost. This rod is long enough for every species. It gives the best fight start against 23 of 72 species but is worse against fish up to 15 cm and fish of 16–35 cm (46 species, e.g. Haze, Suppon, Yamame); averaged over all species it costs 1.5 mistakes you could otherwise afford. Price ¥1,500; sold in area 5 (special rod seller). If you already own this rod, keep using it.

The numbers come from simulated fights: the rod sets the fight meter's starting point, which decides how many mistakes you can afford. This rod costs 1.5 mistakes per species on average (the best rod costs 0). Line strength decides how far a fish may run before the line breaks.

Where to buy

Special rod merchant in town · Area 5 ↗

Technical evidence

Explanation source: rom_trace

data/gear-effects.json ↗

docs/gear-effects.md ↗

docs/fight-model.md ↗

scripts/build_gear_advice.py ↗

Fish this item is matched to (its fight start is adjusted when you fish for them): Koi

A float rod: line strength ×24 holds 72 of 72 species, and it gives the best fight start against 23 of them.

  • Line strength ×24 is long enough for every species, including the biggest.
  • Fight start by fish size: this rod is best for 23 of 72 species and costs 1.5 mistakes on average.
  • This rod is matched to Koi: when you fish for it, the rod skips the size adjustment.

Within Float / Ayu rods: time to aim ranks 6/11 at full HP; line strength ranks 1/11. Rank 1 is longest/highest in that dimension.

ROM price field: ¥1500

  • At 100 HP the automatic aim cutoff is 40 counter ticks. The line range is 8064 internal position units (24 × 336), not meters: the game uses it to decide whether the fish was dragged past the line.
  • The fight meter's start is computed by the routine at 04:8D2A..8EC1 from the rod's class (selector 2), the fish's size and a matching fish ID. The measured effect is in docs/gear-effects.md.

File offset: 0x02A849

Raw bytes: 01 00 28 18 0D 05 08 02 B4 A9 DC 05

Decoded fields

Rod style code
1
Cast/aim hold-time cutoff
40
Reach multiplier
24
Reach threshold (internal units)
8064
Fish-ID comparison code
13
Fight-response branch selector
2
Open full game-screen capture ↗
Hera rod, 3-piece, 3 m
Fishing rods

Hera rod, 3-piece, 3 m

¥200ID 09
Open item details ↗

When should I choose this rod?

For fish that line strength ×12 holds (47 of 72 species); best start against 43 species; worse against fish up to 15 cm (23 species)

Why and what to compare
Full recommendation

Line strength ×12 is how far a fish can run before the line breaks and the hook is lost. This rod holds 47 of 72 species; the other 25 species (e.g. Oo-unagi, Kokuren, Akame) run farther, so they need a longer rod. It gives the best fight start against 43 of 72 species but is worse against fish up to 15 cm (23 species, e.g. Wakasagi, Mugitsuku, Akaza); averaged over all species it costs 0.4 mistakes you could otherwise afford. Price ¥200; sold in areas 4, 5. For fish this line cannot hold, use Ayu carbon rod 10 m (¥1,500, areas 3, 4, 6) or Carp rod 5 m (¥1,500, area 5). If you already own this rod, keep using it.

The numbers come from simulated fights: the rod sets the fight meter's starting point, which decides how many mistakes you can afford. This rod costs 0.4 mistakes per species on average (the best rod costs 0). Line strength decides how far a fish may run before the line breaks.

Where to buy

Town shop · Area 4 ↗ · Area 5 ↗

Technical evidence

Explanation source: rom_trace

data/gear-effects.json ↗

docs/gear-effects.md ↗

docs/fight-model.md ↗

scripts/build_gear_advice.py ↗

Fish this item is matched to (its fight start is adjusted when you fish for them): Herabuna

A float rod: line strength ×12 holds 47 of 72 species, and it gives the best fight start against 43 of them.

  • Line strength ×12 holds 47 of 72 species. The other 25 species (e.g. Oo-unagi, Kokuren, Akame) run farther than that, so the line breaks and the hook is lost; they need a longer rod.
  • Fight start by fish size: this rod is best for 43 of 72 species and costs 0.4 mistakes on average.
  • This rod is matched to Herabuna: when you fish for it, the rod skips the size adjustment.

Within Float / Ayu rods: time to aim ranks 8/11 at full HP; line strength ranks 4/11. Rank 1 is longest/highest in that dimension.

ROM price field: ¥200

  • At 100 HP the automatic aim cutoff is 30 counter ticks. The line range is 4032 internal position units (12 × 336), not meters: the game uses it to decide whether the fish was dragged past the line.
  • The fight meter's start is computed by the routine at 04:8D2A..8EC1 from the rod's class (selector 1), the fish's size and a matching fish ID. The measured effect is in docs/gear-effects.md.

File offset: 0x02A855

Raw bytes: 01 00 1E 0C 25 04 08 01 C0 A9 C8 00

Decoded fields

Rod style code
1
Cast/aim hold-time cutoff
30
Reach multiplier
12
Reach threshold (internal units)
4032
Fish-ID comparison code
37
Fight-response branch selector
1
Open full game-screen capture ↗
Small lure rod
Fishing rods

Small lure rod

¥500ID 0A
Open item details ↗

When should I choose this rod?

For fish that line strength ×15 holds (27 of 38 species); best start against 34 species; worse against fish of 16–35 cm and fish over 35 cm (2 species)

Why and what to compare
Full recommendation

Line strength ×15 is how far a fish can run before the line breaks and the hook is lost. This rod holds 27 of 38 species; the other 11 species (e.g. Oo-unagi, Kokuren, Akame) run farther, so they need a longer rod. It gives the best fight start against 34 of 38 species but is worse against fish of 16–35 cm and fish over 35 cm (2 species, e.g. Ugui, Yamame); averaged over all species it costs 0.1 mistakes you could otherwise afford. Time to aim is 70 at full 100 HP and shorter below that, so restore HP before you fish. Price ¥500; sold in areas 1, 2, 3, 5, 6. For fish this line cannot hold, use the large lure rod (¥600, areas 1, 2, 3, 4, 6) or the heavy-fish lure rod (¥650, area 4). If you already own this rod, keep using it.

The numbers come from simulated fights: the rod sets the fight meter's starting point, which decides how many mistakes you can afford. This rod costs 0.1 mistakes per species on average (the best rod costs 0). Line strength decides how far a fish may run before the line breaks.

Where to buy
Other ways to get or use it
See where to obtain or use this item

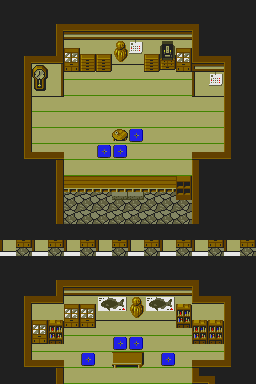
Area 4 · In town · Locked town chest: small lure rod

Locked town chest: small lure rodSmall lure rod

The item image marks the interaction or use point on game terrain. · X 4, Y 6

Bring a key (the chest uses it up) and leave a free rod slot before opening this chest.

Open town terrain for all five rooms ↗ · Open acquisition/use steps and entrance ↗
Technical evidence

Explanation source: rom_trace

data/gear-effects.json ↗

docs/gear-effects.md ↗

docs/fight-model.md ↗

docs/town-item-acquisition-research.md ↗

data/town-item-acquisition.json ↗

scripts/build_gear_advice.py ↗

A lure rod: line strength ×15 holds 27 of 38 species, and it gives the best fight start against 34 of them.

  • Line strength ×15 holds 27 of 38 species. The other 11 species (e.g. Oo-unagi, Kokuren, Akame) run farther than that, so the line breaks and the hook is lost; they need a longer rod.
  • Fight start by fish size: this rod is best for 34 of 38 species and costs 0.1 mistakes on average.
  • Time to aim is 70 at full 100 HP and gets shorter below that.

Within Lure rods: time to aim ranks 4/4 at full HP; line strength ranks 4/4. Rank 1 is longest/highest in that dimension.

ROM price field: ¥500

  • At 100 HP the automatic aim cutoff is 70 counter ticks. The line range is 5040 internal position units (15 × 336), not meters: the game uses it to decide whether the fish was dragged past the line.
  • The fight meter's start is computed by the routine at 04:8D2A..8EC1 from the rod's class (selector 0), the fish's size and a matching fish ID. The measured effect is in docs/gear-effects.md.
  • Below 100 HP the automatic aim cutoff shrinks with current HP (minimum 10); at 100 HP it uses the full value.

File offset: 0x02A861

Raw bytes: 04 02 46 0F 00 0F 08 00 CC A9 F4 01

Decoded fields

Rod style code
4
Cast/aim hold-time cutoff
70
Reach multiplier
15
Reach threshold (internal units)
5040
Fish-ID comparison code
0
Fight-response branch selector
0
Open full game-screen capture ↗
Medium lure rod
Fishing rods

Medium lure rod

ID 0B
Open item details ↗

When should I choose this rod?

Not sold anywhere; if you own it: best start against 34 species; worse against fish of 16–35 cm and fish over 35 cm (2 species)

Why and what to compare
Full recommendation

Line strength ×18 is how far a fish can run before the line breaks and the hook is lost. This rod holds 27 of 38 species; the other 11 species (e.g. Oo-unagi, Kokuren, Akame) run farther, so they need a longer rod. It gives the best fight start against 34 of 38 species but is worse against fish of 16–35 cm and fish over 35 cm (2 species, e.g. Ugui, Yamame); averaged over all species it costs 0.1 mistakes you could otherwise afford. Time to aim is 80 at full 100 HP and shorter below that, so restore HP before you fish. It is not sold in any of the six areas. For fish this line cannot hold, use the large lure rod (¥600, areas 1, 2, 3, 4, 6) or the heavy-fish lure rod (¥650, area 4). If you already own this rod, keep using it.

The numbers come from simulated fights: the rod sets the fight meter's starting point, which decides how many mistakes you can afford. This rod costs 0.1 mistakes per species on average (the best rod costs 0). Line strength decides how far a fish may run before the line breaks.

Where to buy

This ID is absent from the decoded stocks of all six area shops, so no purchase location is listed for this record.

Technical evidence

Explanation source: rom_trace

data/gear-effects.json ↗

docs/gear-effects.md ↗

docs/fight-model.md ↗

scripts/build_gear_advice.py ↗

A lure rod: line strength ×18 holds 27 of 38 species, and it gives the best fight start against 34 of them.

  • Line strength ×18 holds 27 of 38 species. The other 11 species (e.g. Oo-unagi, Kokuren, Akame) run farther than that, so the line breaks and the hook is lost; they need a longer rod.
  • Fight start by fish size: this rod is best for 34 of 38 species and costs 0.1 mistakes on average.
  • Time to aim is 80 at full 100 HP and gets shorter below that.

Within Lure rods: time to aim ranks 3/4 at full HP; line strength ranks 3/4. Rank 1 is longest/highest in that dimension.

ROM price field: ¥550

  • At 100 HP the automatic aim cutoff is 80 counter ticks. The line range is 6048 internal position units (18 × 336), not meters: the game uses it to decide whether the fish was dragged past the line.
  • The fight meter's start is computed by the routine at 04:8D2A..8EC1 from the rod's class (selector 0), the fish's size and a matching fish ID. The measured effect is in docs/gear-effects.md.
  • Below 100 HP the automatic aim cutoff shrinks with current HP (minimum 10); at 100 HP it uses the full value.

File offset: 0x02A86D

Raw bytes: 04 02 50 12 00 10 08 00 D5 A9 26 02

Decoded fields

Rod style code
4
Cast/aim hold-time cutoff
80
Reach multiplier
18
Reach threshold (internal units)
6048
Fish-ID comparison code
0
Fight-response branch selector
0
Open full game-screen capture ↗
Large lure rod
Fishing rods

Large lure rod

¥600ID 0C
Open item details ↗

When should I choose this rod?

For fish that line strength ×21 holds (27 of 38 species); best start against 32 species; worse against fish up to 15 cm (4 species)

Why and what to compare
Full recommendation

Line strength ×21 is how far a fish can run before the line breaks and the hook is lost. This rod holds 27 of 38 species; the other 11 species (e.g. Oo-unagi, Kokuren, Akame) run farther, so they need a longer rod. It gives the best fight start against 32 of 38 species but is worse against fish up to 15 cm (4 species, e.g. Kusafugu, Oyanirami, Aburahaya); averaged over all species it costs 0.2 mistakes you could otherwise afford. Time to aim is 100 at full 100 HP and shorter below that, so restore HP before you fish. Price ¥600; sold in areas 1, 2, 3, 4, 6. For fish this line cannot hold, use the heavy-fish lure rod (¥650, area 4). If you already own this rod, keep using it.

The numbers come from simulated fights: the rod sets the fight meter's starting point, which decides how many mistakes you can afford. This rod costs 0.2 mistakes per species on average (the best rod costs 0). Line strength decides how far a fish may run before the line breaks.

Compare with:

Heavy-fish lure rod
Where to buy
Technical evidence

Explanation source: rom_trace

data/gear-effects.json ↗

docs/gear-effects.md ↗

docs/fight-model.md ↗

scripts/build_gear_advice.py ↗

A lure rod: line strength ×21 holds 27 of 38 species, and it gives the best fight start against 32 of them.

  • Line strength ×21 holds 27 of 38 species. The other 11 species (e.g. Oo-unagi, Kokuren, Akame) run farther than that, so the line breaks and the hook is lost; they need a longer rod.
  • Fight start by fish size: this rod is best for 32 of 38 species and costs 0.2 mistakes on average.
  • Time to aim is 100 at full 100 HP and gets shorter below that.

Within Lure rods: time to aim ranks 2/4 at full HP; line strength ranks 2/4. Rank 1 is longest/highest in that dimension.

ROM price field: ¥600

  • At 100 HP the automatic aim cutoff is 100 counter ticks. The line range is 7056 internal position units (21 × 336), not meters: the game uses it to decide whether the fish was dragged past the line.
  • The fight meter's start is computed by the routine at 04:8D2A..8EC1 from the rod's class (selector 1), the fish's size and a matching fish ID. The measured effect is in docs/gear-effects.md.
  • Below 100 HP the automatic aim cutoff shrinks with current HP (minimum 10); at 100 HP it uses the full value.

File offset: 0x02A879

Raw bytes: 04 02 64 15 00 11 08 01 DE A9 58 02

Decoded fields

Rod style code
4
Cast/aim hold-time cutoff
100
Reach multiplier
21
Reach threshold (internal units)
7056
Fish-ID comparison code
0
Fight-response branch selector
1
Open full game-screen capture ↗
Heavy-fish lure rod
Fishing rods

Heavy-fish lure rod

¥650ID 0D
Open item details ↗

When should I choose this rod?

For big fish: line strength ×24 is long enough for every species; best start against 19 species; worse against fish up to 15 cm and fish of 16–35 cm (16 species)

Why and what to compare
Full recommendation

Line strength ×24 is how far a fish can run before the line breaks and the hook is lost. This rod is long enough for every species. It gives the best fight start against 19 of 38 species but is worse against fish up to 15 cm and fish of 16–35 cm (16 species, e.g. Haze, Suppon, Yamame); averaged over all species it costs 1 mistakes you could otherwise afford. Time to aim is 120 at full 100 HP and shorter below that, so restore HP before you fish. Price ¥650; sold in area 4 (special rod seller). If you already own this rod, keep using it.

The numbers come from simulated fights: the rod sets the fight meter's starting point, which decides how many mistakes you can afford. This rod costs 1 mistakes per species on average (the best rod costs 0). Line strength decides how far a fish may run before the line breaks.

Where to buy

Special rod merchant in town · Area 4 ↗

Technical evidence

Explanation source: rom_trace

data/gear-effects.json ↗

docs/gear-effects.md ↗

docs/fight-model.md ↗

scripts/build_gear_advice.py ↗

Fish this item is matched to (its fight start is adjusted when you fish for them): Namazu

A lure rod: line strength ×24 holds 38 of 38 species, and it gives the best fight start against 19 of them.

  • Line strength ×24 is long enough for every species, including the biggest.
  • Fight start by fish size: this rod is best for 19 of 38 species and costs 1 mistakes on average.
  • Time to aim is 120 at full 100 HP and gets shorter below that.
  • This rod is matched to Namazu: when you fish for it, the rod skips the size adjustment.

Within Lure rods: time to aim ranks 1/4 at full HP; line strength ranks 1/4. Rank 1 is longest/highest in that dimension.

ROM price field: ¥650

  • At 100 HP the automatic aim cutoff is 120 counter ticks. The line range is 8064 internal position units (24 × 336), not meters: the game uses it to decide whether the fish was dragged past the line.
  • The fight meter's start is computed by the routine at 04:8D2A..8EC1 from the rod's class (selector 2), the fish's size and a matching fish ID. The measured effect is in docs/gear-effects.md.
  • Below 100 HP the automatic aim cutoff shrinks with current HP (minimum 10); at 100 HP it uses the full value.

File offset: 0x02A885

Raw bytes: 04 02 78 18 26 12 08 02 E7 A9 8A 02

Decoded fields

Rod style code
4
Cast/aim hold-time cutoff
120
Reach multiplier
24
Reach threshold (internal units)
8064
Fish-ID comparison code
38
Fight-response branch selector
2
Open full game-screen capture ↗
Small casting rod
Fishing rods

Small casting rod

¥250ID 0E
Open item details ↗

When should I choose this rod?

For fish that line strength ×18 holds (25 of 30 species); best start against 24 species; worse against fish of 16–35 cm (3 species)

Why and what to compare
Full recommendation

Line strength ×18 is how far a fish can run before the line breaks and the hook is lost. This rod holds 25 of 30 species; the other 5 species (e.g. Oo-unagi, Aouo, Unagi) run farther, so they need a longer rod. It gives the best fight start against 24 of 30 species but is worse against fish of 16–35 cm (3 species, e.g. Donko, Kamatsuka, Yamanokami); averaged over all species it costs 0.2 mistakes you could otherwise afford. Time to aim is 70 at full 100 HP and shorter below that, so restore HP before you fish. Price ¥250; sold in areas 1, 3, 4, 5, 6. For fish this line cannot hold, use the medium casting rod (¥600, areas 2, 4, 5, 6) or the two-handed casting rod (¥1,500, area 6). If you already own this rod, keep using it.

The numbers come from simulated fights: the rod sets the fight meter's starting point, which decides how many mistakes you can afford. This rod costs 0.2 mistakes per species on average (the best rod costs 0). Line strength decides how far a fish may run before the line breaks.

Where to buy
Technical evidence

Explanation source: rom_trace

data/gear-effects.json ↗

docs/gear-effects.md ↗

docs/fight-model.md ↗

scripts/build_gear_advice.py ↗

A casting rod: line strength ×18 holds 25 of 30 species, and it gives the best fight start against 24 of them.

  • Line strength ×18 holds 25 of 30 species. The other 5 species (e.g. Oo-unagi, Aouo, Unagi) run farther than that, so the line breaks and the hook is lost; they need a longer rod.
  • Fight start by fish size: this rod is best for 24 of 30 species and costs 0.2 mistakes on average.
  • Time to aim is 70 at full 100 HP and gets shorter below that.

Within Casting rods: time to aim ranks 3/3 at full HP; line strength ranks 3/3. Rank 1 is longest/highest in that dimension.

ROM price field: ¥250

  • At 100 HP the automatic aim cutoff is 70 counter ticks. The line range is 6048 internal position units (18 × 336), not meters: the game uses it to decide whether the fish was dragged past the line.
  • The fight meter's start is computed by the routine at 04:8D2A..8EC1 from the rod's class (selector 0), the fish's size and a matching fish ID. The measured effect is in docs/gear-effects.md.
  • Below 100 HP the automatic aim cutoff shrinks with current HP (minimum 10); at 100 HP it uses the full value.

File offset: 0x02A891

Raw bytes: 02 02 46 12 00 13 0E 00 F4 A9 FA 00

Decoded fields

Rod style code
2
Cast/aim hold-time cutoff
70
Reach multiplier
18
Reach threshold (internal units)
6048
Fish-ID comparison code
0
Fight-response branch selector
0
Open full game-screen capture ↗
Medium casting rod
Fishing rods

Medium casting rod

¥600ID 0F
Open item details ↗

When should I choose this rod?

For fish that line strength ×21 holds (26 of 30 species); best start against 18 species; worse against fish up to 15 cm (9 species)

Why and what to compare
Full recommendation

Line strength ×21 is how far a fish can run before the line breaks and the hook is lost. This rod holds 26 of 30 species; the other 4 species (e.g. Oo-unagi, Aouo, Unagi) run farther, so they need a longer rod. It gives the best fight start against 18 of 30 species but is worse against fish up to 15 cm (9 species, e.g. Akaza, Shimadojou, Dojou); averaged over all species it costs 0.4 mistakes you could otherwise afford. Time to aim is 100 at full 100 HP and shorter below that, so restore HP before you fish. Price ¥600; sold in areas 2, 4, 5, 6. For fish this line cannot hold, use the two-handed casting rod (¥1,500, area 6). If you already own this rod, keep using it.

The numbers come from simulated fights: the rod sets the fight meter's starting point, which decides how many mistakes you can afford. This rod costs 0.4 mistakes per species on average (the best rod costs 0). Line strength decides how far a fish may run before the line breaks.

Where to buy
Technical evidence

Explanation source: rom_trace

data/gear-effects.json ↗

docs/gear-effects.md ↗

docs/fight-model.md ↗

scripts/build_gear_advice.py ↗

A casting rod: line strength ×21 holds 26 of 30 species, and it gives the best fight start against 18 of them.

  • Line strength ×21 holds 26 of 30 species. The other 4 species (e.g. Oo-unagi, Aouo, Unagi) run farther than that, so the line breaks and the hook is lost; they need a longer rod.
  • Fight start by fish size: this rod is best for 18 of 30 species and costs 0.4 mistakes on average.
  • Time to aim is 100 at full 100 HP and gets shorter below that.

Within Casting rods: time to aim ranks 2/3 at full HP; line strength ranks 2/3. Rank 1 is longest/highest in that dimension.

ROM price field: ¥600

  • At 100 HP the automatic aim cutoff is 100 counter ticks. The line range is 7056 internal position units (21 × 336), not meters: the game uses it to decide whether the fish was dragged past the line.
  • The fight meter's start is computed by the routine at 04:8D2A..8EC1 from the rod's class (selector 1), the fish's size and a matching fish ID. The measured effect is in docs/gear-effects.md.
  • Below 100 HP the automatic aim cutoff shrinks with current HP (minimum 10); at 100 HP it uses the full value.

File offset: 0x02A89D

Raw bytes: 02 02 64 15 00 14 0E 01 FC A9 58 02

Decoded fields

Rod style code
2
Cast/aim hold-time cutoff
100
Reach multiplier
21
Reach threshold (internal units)
7056
Fish-ID comparison code
0
Fight-response branch selector
1
Open full game-screen capture ↗
Two-handed casting rod
Fishing rods

Two-handed casting rod

¥1500ID 10
Open item details ↗

When should I choose this rod?

For big fish: line strength ×24 is long enough for every species; best start against 10 species; worse against fish up to 15 cm and fish of 16–35 cm (19 species)

Why and what to compare
Full recommendation

Line strength ×24 is how far a fish can run before the line breaks and the hook is lost. This rod is long enough for every species. It gives the best fight start against 10 of 30 species but is worse against fish up to 15 cm and fish of 16–35 cm (19 species, e.g. Haze, Gigi, Mabuna); averaged over all species it costs 1.4 mistakes you could otherwise afford. Time to aim is 120 at full 100 HP and shorter below that, so restore HP before you fish. Price ¥1,500; sold in area 6 (special rod seller). If you already own this rod, keep using it.

The numbers come from simulated fights: the rod sets the fight meter's starting point, which decides how many mistakes you can afford. This rod costs 1.4 mistakes per species on average (the best rod costs 0). Line strength decides how far a fish may run before the line breaks.

Where to buy

Special rod merchant in town · Area 6 ↗

Technical evidence

Explanation source: rom_trace

data/gear-effects.json ↗

docs/gear-effects.md ↗

docs/fight-model.md ↗

scripts/build_gear_advice.py ↗

Fish this item is matched to (its fight start is adjusted when you fish for them): Akame

A casting rod: line strength ×24 holds 30 of 30 species, and it gives the best fight start against 10 of them.

  • Line strength ×24 is long enough for every species, including the biggest.
  • Fight start by fish size: this rod is best for 10 of 30 species and costs 1.4 mistakes on average.
  • Time to aim is 120 at full 100 HP and gets shorter below that.
  • This rod is matched to Akame: when you fish for it, the rod skips the size adjustment.

Within Casting rods: time to aim ranks 1/3 at full HP; line strength ranks 1/3. Rank 1 is longest/highest in that dimension.

ROM price field: ¥1500

  • At 100 HP the automatic aim cutoff is 120 counter ticks. The line range is 8064 internal position units (24 × 336), not meters: the game uses it to decide whether the fish was dragged past the line.
  • The fight meter's start is computed by the routine at 04:8D2A..8EC1 from the rod's class (selector 2), the fish's size and a matching fish ID. The measured effect is in docs/gear-effects.md.
  • Below 100 HP the automatic aim cutoff shrinks with current HP (minimum 10); at 100 HP it uses the full value.

File offset: 0x02A8A9

Raw bytes: 02 02 78 18 37 07 0E 02 04 AA DC 05

Decoded fields

Rod style code
2
Cast/aim hold-time cutoff
120
Reach multiplier
24
Reach threshold (internal units)
8064
Fish-ID comparison code
55
Fight-response branch selector
2
Open full game-screen capture ↗
Small fly rod
Fishing rods

Small fly rod

ID 11
Open item details ↗

When should I choose this rod?

Not sold anywhere; if you own it: best start against 25 species; worse against fish of 16–35 cm (4 species)

Why and what to compare
Full recommendation

Line strength ×15 is how far a fish can run before the line breaks and the hook is lost. This rod holds 30 of 33 species; the other 3 species (e.g. Aouo, Black bass, Nijimasu (rainbow trout)) run farther, so they need a longer rod. It gives the best fight start against 25 of 33 species but is worse against fish of 16–35 cm (4 species, e.g. Yamame, Donko, Kamatsuka); averaged over all species it costs 0.2 mistakes you could otherwise afford. It is not sold in any of the six areas. For fish this line cannot hold, use the medium fly rod (¥400, areas 1, 2, 3, 5). If you already own this rod, keep using it.

The numbers come from simulated fights: the rod sets the fight meter's starting point, which decides how many mistakes you can afford. This rod costs 0.2 mistakes per species on average (the best rod costs 0). Line strength decides how far a fish may run before the line breaks.

Compare with:

Medium fly rod
Where to buy

This ID is absent from the decoded stocks of all six area shops, so no purchase location is listed for this record.

Technical evidence

Explanation source: rom_trace

data/gear-effects.json ↗

docs/gear-effects.md ↗

docs/fight-model.md ↗

scripts/build_gear_advice.py ↗

A fly rod: line strength ×15 holds 30 of 33 species, and it gives the best fight start against 25 of them.

  • Line strength ×15 holds 30 of 33 species. The other 3 species (e.g. Aouo, Black bass, Nijimasu (rainbow trout)) run farther than that, so the line breaks and the hook is lost; they need a longer rod.
  • Fight start by fish size: this rod is best for 25 of 33 species and costs 0.2 mistakes on average.

Within Fly rods: time to aim ranks 3/3 at full HP; line strength ranks 3/3. Rank 1 is longest/highest in that dimension.

ROM price field: ¥350

  • At 100 HP the automatic aim cutoff is 50 counter ticks. The line range is 5040 internal position units (15 × 336), not meters: the game uses it to decide whether the fish was dragged past the line.
  • The fight meter's start is computed by the routine at 04:8D2A..8EC1 from the rod's class (selector 0), the fish's size and a matching fish ID. The measured effect is in docs/gear-effects.md.

File offset: 0x02A8B5

Raw bytes: 08 02 32 0F 00 0C 08 00 0E AA 5E 01

Decoded fields

Rod style code
8
Cast/aim hold-time cutoff
50
Reach multiplier
15
Reach threshold (internal units)
5040
Fish-ID comparison code
0
Fight-response branch selector
0
Open full game-screen capture ↗
Medium fly rod
Fishing rods

Medium fly rod

¥400ID 12
Open item details ↗

When should I choose this rod?

For fish that line strength ×18 holds (30 of 33 species); best start against 20 species; worse against fish up to 15 cm (10 species)

Why and what to compare
Full recommendation

Line strength ×18 is how far a fish can run before the line breaks and the hook is lost. This rod holds 30 of 33 species; the other 3 species (e.g. Aouo, Black bass, Nijimasu (rainbow trout)) run farther, so they need a longer rod. It gives the best fight start against 20 of 33 species but is worse against fish up to 15 cm (10 species, e.g. Mugitsuku, Akaza, Oyanirami); averaged over all species it costs 0.4 mistakes you could otherwise afford. Price ¥400; sold in areas 1, 2, 3, 5. For fish this line cannot hold, use the large fly rod (¥450, areas 1, 2, 3, 4). If you already own this rod, keep using it.

The numbers come from simulated fights: the rod sets the fight meter's starting point, which decides how many mistakes you can afford. This rod costs 0.4 mistakes per species on average (the best rod costs 0). Line strength decides how far a fish may run before the line breaks.

Compare with:

Large fly rod
Where to buy
Technical evidence

Explanation source: rom_trace

data/gear-effects.json ↗

docs/gear-effects.md ↗

docs/fight-model.md ↗

scripts/build_gear_advice.py ↗

A fly rod: line strength ×18 holds 30 of 33 species, and it gives the best fight start against 20 of them.

  • Line strength ×18 holds 30 of 33 species. The other 3 species (e.g. Aouo, Black bass, Nijimasu (rainbow trout)) run farther than that, so the line breaks and the hook is lost; they need a longer rod.
  • Fight start by fish size: this rod is best for 20 of 33 species and costs 0.4 mistakes on average.

Within Fly rods: time to aim ranks 2/3 at full HP; line strength ranks 2/3. Rank 1 is longest/highest in that dimension.

ROM price field: ¥400

  • At 100 HP the automatic aim cutoff is 60 counter ticks. The line range is 6048 internal position units (18 × 336), not meters: the game uses it to decide whether the fish was dragged past the line.
  • The fight meter's start is computed by the routine at 04:8D2A..8EC1 from the rod's class (selector 1), the fish's size and a matching fish ID. The measured effect is in docs/gear-effects.md.

File offset: 0x02A8C1

Raw bytes: 08 02 3C 12 00 0D 08 01 17 AA 90 01

Decoded fields

Rod style code
8
Cast/aim hold-time cutoff
60
Reach multiplier
18
Reach threshold (internal units)
6048
Fish-ID comparison code
0
Fight-response branch selector
1
Open full game-screen capture ↗
Large fly rod
Fishing rods

Large fly rod

¥450ID 13
Open item details ↗

When should I choose this rod?

For fish that line strength ×21 holds (30 of 33 species); best start against 9 species; worse against fish up to 15 cm and fish of 16–35 cm (22 species)

Why and what to compare
Full recommendation

Line strength ×21 is how far a fish can run before the line breaks and the hook is lost. This rod holds 30 of 33 species; the other 3 species (e.g. Aouo, Black bass, Nijimasu (rainbow trout)) run farther, so they need a longer rod. It gives the best fight start against 9 of 33 species but is worse against fish up to 15 cm and fish of 16–35 cm (22 species, e.g. Yamame, Bluegill, Gigi); averaged over all species it costs 1.7 mistakes you could otherwise afford. Price ¥450; sold in areas 1, 2, 3, 4. If you already own this rod, keep using it.

The numbers come from simulated fights: the rod sets the fight meter's starting point, which decides how many mistakes you can afford. This rod costs 1.7 mistakes per species on average (the best rod costs 0). Line strength decides how far a fish may run before the line breaks.

Where to buy
Technical evidence

Explanation source: rom_trace

data/gear-effects.json ↗

docs/gear-effects.md ↗

docs/fight-model.md ↗

scripts/build_gear_advice.py ↗

A fly rod: line strength ×21 holds 30 of 33 species, and it gives the best fight start against 9 of them.

  • Line strength ×21 holds 30 of 33 species. The other 3 species (e.g. Aouo, Black bass, Nijimasu (rainbow trout)) run farther than that, so the line breaks and the hook is lost; they need a longer rod.
  • Fight start by fish size: this rod is best for 9 of 33 species and costs 1.7 mistakes on average.

Within Fly rods: time to aim ranks 1/3 at full HP; line strength ranks 1/3. Rank 1 is longest/highest in that dimension.

ROM price field: ¥450

  • At 100 HP the automatic aim cutoff is 70 counter ticks. The line range is 7056 internal position units (21 × 336), not meters: the game uses it to decide whether the fish was dragged past the line.
  • The fight meter's start is computed by the routine at 04:8D2A..8EC1 from the rod's class (selector 2), the fish's size and a matching fish ID. The measured effect is in docs/gear-effects.md.

File offset: 0x02A8CD

Raw bytes: 08 02 46 15 00 0E 08 02 20 AA C2 01

Decoded fields

Rod style code
8
Cast/aim hold-time cutoff
70
Reach multiplier
21
Reach threshold (internal units)
7056
Fish-ID comparison code
0
Fight-response branch selector
2
Open full game-screen capture ↗
Ayu carbon rod, 10 m
Fishing rods

Ayu carbon rod, 10 m

¥1500ID 14
Open item details ↗

When should I choose this rod?

For fish that line strength ×15 holds (57 of 72 species); best start against 42 species; worse against fish up to 15 cm (23 species)

Why and what to compare
Full recommendation

Line strength ×15 is how far a fish can run before the line breaks and the hook is lost. This rod holds 57 of 72 species; the other 15 species (e.g. Oo-unagi, Kokuren, Akame) run farther, so they need a longer rod. It gives the best fight start against 42 of 72 species but is worse against fish up to 15 cm (23 species, e.g. Wakasagi, Mugitsuku, Akaza); averaged over all species it costs 0.4 mistakes you could otherwise afford. Price ¥1,500; sold in areas 3, 4, 6. For fish this line cannot hold, use Carp rod 5 m (¥1,500, area 5). If you already own this rod, keep using it.

The numbers come from simulated fights: the rod sets the fight meter's starting point, which decides how many mistakes you can afford. This rod costs 0.4 mistakes per species on average (the best rod costs 0). Line strength decides how far a fish may run before the line breaks.

Where to buy

Town shop · Area 3 ↗ · Area 4 ↗ · Area 6 ↗

Technical evidence

Explanation source: rom_trace

data/gear-effects.json ↗

docs/gear-effects.md ↗

docs/fight-model.md ↗

scripts/build_gear_advice.py ↗

Fish this item is matched to (its fight start is adjusted when you fish for them): Ayu

A float rod: line strength ×15 holds 57 of 72 species, and it gives the best fight start against 42 of them.

  • Line strength ×15 holds 57 of 72 species. The other 15 species (e.g. Oo-unagi, Kokuren, Akame) run farther than that, so the line breaks and the hook is lost; they need a longer rod.
  • Fight start by fish size: this rod is best for 42 of 72 species and costs 0.4 mistakes on average.
  • This rod is matched to Ayu: when you fish for it, the rod skips the size adjustment.

Within Float / Ayu rods: time to aim ranks 1/11 at full HP; line strength ranks 3/11. Rank 1 is longest/highest in that dimension.

ROM price field: ¥1500

  • At 100 HP the automatic aim cutoff is 80 counter ticks. The line range is 5040 internal position units (15 × 336), not meters: the game uses it to decide whether the fish was dragged past the line.
  • The fight meter's start is computed by the routine at 04:8D2A..8EC1 from the rod's class (selector 1), the fish's size and a matching fish ID. The measured effect is in docs/gear-effects.md.

File offset: 0x02A8D9

Raw bytes: 01 02 50 0F 38 08 0E 01 29 AA DC 05

Decoded fields

Rod style code
1
Cast/aim hold-time cutoff
80
Reach multiplier
15
Reach threshold (internal units)
5040
Fish-ID comparison code
56
Fight-response branch selector
1
Open full game-screen capture ↗
Hera carbon rod, 6.5 m
Fishing rods

Hera carbon rod, 6.5 m

¥2000ID 15
Open item details ↗

When should I choose this rod?

For big fish: line strength ×24 is long enough for every species; best start against 43 species; worse against fish up to 15 cm (23 species)

Why and what to compare
Full recommendation

Line strength ×24 is how far a fish can run before the line breaks and the hook is lost. This rod is long enough for every species. It gives the best fight start against 43 of 72 species but is worse against fish up to 15 cm (23 species, e.g. Wakasagi, Mugitsuku, Akaza); averaged over all species it costs 0.4 mistakes you could otherwise afford. Price ¥2,000; sold in areas 4, 5, 6. If you already own this rod, keep using it.

The numbers come from simulated fights: the rod sets the fight meter's starting point, which decides how many mistakes you can afford. This rod costs 0.4 mistakes per species on average (the best rod costs 0). Line strength decides how far a fish may run before the line breaks.

Where to buy

Town shop · Area 4 ↗ · Area 5 ↗ · Area 6 ↗

Technical evidence

Explanation source: rom_trace

data/gear-effects.json ↗

docs/gear-effects.md ↗

docs/fight-model.md ↗

scripts/build_gear_advice.py ↗

Fish this item is matched to (its fight start is adjusted when you fish for them): Herabuna

A float rod: line strength ×24 holds 72 of 72 species, and it gives the best fight start against 43 of them.

  • Line strength ×24 is long enough for every species, including the biggest.
  • Fight start by fish size: this rod is best for 43 of 72 species and costs 0.4 mistakes on average.
  • This rod is matched to Herabuna: when you fish for it, the rod skips the size adjustment.

Within Float / Ayu rods: time to aim ranks 3/11 at full HP; line strength ranks 1/11. Rank 1 is longest/highest in that dimension.

ROM price field: ¥2000

  • At 100 HP the automatic aim cutoff is 60 counter ticks. The line range is 8064 internal position units (24 × 336), not meters: the game uses it to decide whether the fish was dragged past the line.
  • The fight meter's start is computed by the routine at 04:8D2A..8EC1 from the rod's class (selector 1), the fish's size and a matching fish ID. The measured effect is in docs/gear-effects.md.

File offset: 0x02A8E5

Raw bytes: 01 02 3C 18 25 0B 0E 01 35 AA D0 07

Decoded fields

Rod style code
1
Cast/aim hold-time cutoff
60
Reach multiplier
24
Reach threshold (internal units)
8064
Fish-ID comparison code
37
Fight-response branch selector
1
Open full game-screen capture ↗
Quick guide · what to buy and carry

What to buy, carry and do before fishing

A lure set covering the compatible species

Two lures cover all 38 lure fish. The guidance card and the table below list the pair you can buy complete in each area. A fish follows when it is on the lure’s tile and you keep tapping A or B; press A once when it is level with the lure to hook it.

See the illustrated set and fish table
Building your own fly: do you need to, when, and how

THE FLY MAKER GUIDE

Do I need to build a fly?

Usually not. The shop sells ready-made sets made from the same parts. You get the very same fly, and it costs less, because a ready-made set charges only the body’s price while the maker charges body + wing + tail. For example, the shop sells body 2B + wing 34 for ¥15; the same fly from the maker costs ¥23.

When is building one worth it?

  • You want a body and wing combination no shop sells, for instance a body your target fish takes whose ready-made set carries a wing a fresh save locks (wing group 2), so you build it with a wing from another group.
  • You want a specific body family, such as a hopper (it helps in the fight against fish of 16 to 35 cm) or a terrestrial body no shop sells ready-made.
  • In every other case, buy the ready-made set.

The fly maker exists in Areas 1 to 3 only. Wings 25, 66 and 67 are in no shop and not in the maker.

How to build: screens from the game

Original Japanese game captures; the Mayfly menu shows the buttons and the price. Careful: the example recipes in the pictures (body 01, and body 02 with wing 0A) are locked on a fresh save and never bite. They teach the buttons only; pick your real parts from the table below.

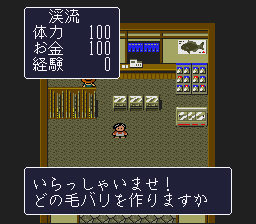
In the Area 1 tackle shop, walk into the person behind the main counter to start fly creation. Advance the dialogue with A.
01In the Area 1 tackle shop, walk into the person behind the main counter to start fly creation. Advance the dialogue with A.
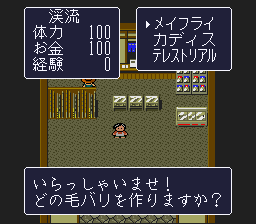
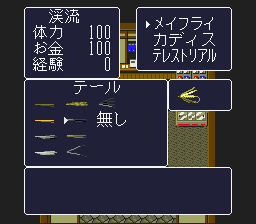
Choose Mayfly (メイフライ) to follow this example. Confirm with A.
02Choose Mayfly (メイフライ) to follow this example. Confirm with A.
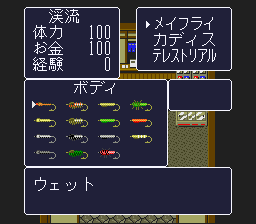
At the default body cursor (top left), A selects body01 for the ¥25 example. Down once then A selects body02; Right once then A selects body05. Other positions are not mapped here. Button demo only: body 01 is group 1, which a fresh save locks.
03At the default body cursor (top left), A selects body01 for the ¥25 example. Down once then A selects body02; Right once then A selects body05. Other positions are not mapped here. Button demo only: body 01 is group 1, which a fresh save locks.
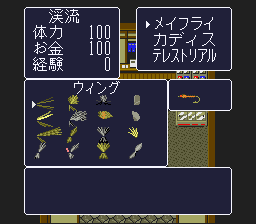
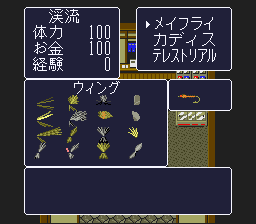
At the default wing cursor, A selects09 for this example. Down once then A selects0A; Right once then A selects0D. Wing 0A is group 2, which a fresh save locks; wing 09 is fine.
04At the default wing cursor, A selects09 for this example. Down once then A selects0A; Right once then A selects0D. Wing 0A is group 2, which a fresh save locks; wing 09 is fine.
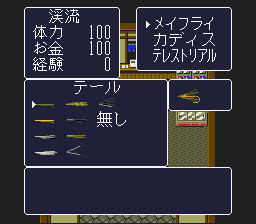
A at the default tail cursor selects13 for the ¥25 example. To omit the tail, from the default position press Down once, Right twice, then A on None (無し). Check the final quote.
05A at the default tail cursor selects13 for the ¥25 example. To omit the tail, from the default position press Down once, Right twice, then A on None (無し). Check the final quote.
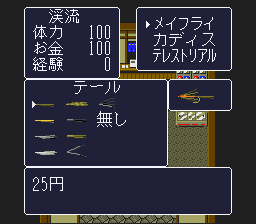
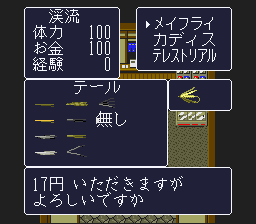
Read the quote before confirming. The recorded first body + first wing + first tail order is ¥25; other recipes need their own quote.
06Read the quote before confirming. The recorded first body + first wing + first tail order is ¥25; other recipes need their own quote.
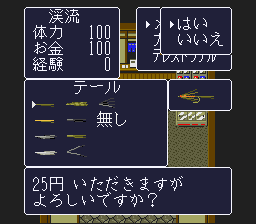
Choose Yes (はい) to pay and create the fly. In this recorded order, money falls from ¥100 to ¥75.
07Choose Yes (はい) to pay and create the fly. In this recorded order, money falls from ¥100 to ¥75.
Another tested recipe: body02 (Down once, A), wing0A (Down once, A), then tail None (Down once, Right twice, A). Each part starts from its default cursor. This is an example recipe, not a best-fly recommendation. Button demo only: wing 0A is locked on a fresh save, so this fly never bites there.
08Another tested recipe: body02 (Down once, A), wing0A (Down once, A), then tail None (Down once, Right twice, A). Each part starts from its default cursor. This is an example recipe, not a best-fly recommendation. Button demo only: wing 0A is locked on a fresh save, so this fly never bites there.
This02/0A/no-tail recipe is quoted at ¥17. Accepting Yes stores the completed fly and changes money100→83. The01/0A/no-tail preview quotes ¥12, but that preview was not purchased. This recipe is also locked on a fresh save (wing 0A).
09This02/0A/no-tail recipe is quoted at ¥17. Accepting Yes stores the completed fly and changes money100→83. The01/0A/no-tail preview quotes ¥12, but that preview was not purchased. This recipe is also locked on a fresh save (wing 0A).

AREA 1 · MAYFLY · GAME MENU

Find a wing by its menu position

Find a wing by row and column; select its tile to open the item record. Row 2 of every column is a group-2 wing, which a fresh save locks: pick another row.

Start at the top-left. Press Right column − 1 times, Down row − 1 times, then A to select.

Technical evidence and limits

In four extra right-edge checks, pressing Right past column 4 left the cursor on the same column-4 ID for that row. This only describes this tested menu. Wing 25 is in no shop and not in the maker; wing 26 exists only inside one ready-made set.

The menu position gives only the wing ID. No wing is better than another: a wing is only a ticket past the save’s lock, and the group-2 wings (0A, 0E, 12, 22) are locked on a fresh save.

Evidence: original Japanese ROM; controller-only selection; selected wing ID read from WRAM $1D37; independent replay matched all 16 positions.

Read the full research notes ↗

Always read the final quote before paying. In the first example, first body + first wing + first tail cost ¥25; choosing “None” for the tail changes the recipe and its price, so read each quote separately.

What each part changes

Part What it changes What it does not change
Body Which fish bite: wet bodies 33 fish, dry and terrestrial bodies 17.
The body half of your save’s lock: a group-1 body never bites on a fresh save.
How the fight starts: Caddis and hopper bodies help against fish of 16 to 35 cm; other families help against fish up to 15 cm and hurt against fish over 35 cm.
How fast fish bite: once the fly passes the lock, it bites within seconds.
Wing Only the wing half of your save’s lock: a group-2 wing never bites on a fresh save (in the Mayfly menu that is row 2 of every column). Which fish bite, the fight and the bite speed. A pricier wing is not better.
Tail Nothing; it is only looks. Bites and the fight. Choose “None” (¥0) to save money.

The save’s lock: every save hides two numbers, a body group and a wing group (0 to 3). A fly never bites if its body group or wing group equals the saved number. A group is the part’s ID (in decimal) divided by 4, remainder only. A save that has never rested at an inn holds body group 1 and wing group 2. An inn rest has about a 34% chance of changing one of them; re-equip your fly afterwards. Travelling and recasting never change the lock.

Research, raw fields and sources

A FEW DECODED EXAMPLES

The numbers finally have context

The ROM stores real numeric fields, but many are internal selectors rather than familiar “power” or “bite rate” stats. These examples show exact values and what the game code does with them.

Item ROM fields we can explain ROM price field
0ASmall lure rodルアーロッド小
Cast/aim hold-time cutoff 70; reach multiplier 15 × 336 = 5,040 internal units. Under 100 HP the cutoff scales with current HP (minimum 10).¥500
0DHeavy-fish lure rod大物用ルアーロッド
Cast/aim hold-time cutoff 120; reach multiplier 24 × 336 = 8,064 internal units. Under 100 HP the cutoff scales with current HP (minimum 10).¥650
12Spinnerbaitスピナーベイト
Action branch 9; conditional fish-ID comparison value 11 → Black bass. Changes a behavior path; does not prove an exclusive target or bonus.¥35
21Soft red frogソフト・赤ガエル
Action branch 7; conditional fish-ID comparison value 38 → Namazu. Changes a behavior path; does not prove an exclusive target or bonus.¥75
51Sinking lureシンキング
Action branch 5; conditional fish-ID comparison value 55 → Akame. Changes a behavior path; does not prove an exclusive target or bonus.¥500
01Mandarin orangeミカン
Runtime-measured recovery: 5 HP.¥5
0AMushroom (red with yellow spots, poison)きのこ
Runtime-measured result: HP becomes 0.¥0

HOW TO READ THIS

Confirmed, translated, and still unknown

The catalogue contains all 315 named/listed entries: 21 rods, 81 lures, 64 fly-body records, 47 wing records, 23 tail records, 23 baits, 13 hooks, 10 floats/sinkers, 10 foods, and 23 tools/quest items. The 64 bodies + 47 wings + 23 tails account for all 134 fly-table records.

All 134 ROM fly-table records are represented here as 64 bodies, 47 wings, and 23 tails. ID 87 is a no-item code and is excluded.

ROM price fields are not proof of shop stock. A zero field does not establish a free item. Fly-table price values are treated as component fields, not finished-fly retail prices.

The custom fly maker was directly observed in the first-stage shop. Captured sequence: choose family, body, wing, tail or none, then confirm. The observed Mayfly palette had 20 wing choices and 9 tail sprites plus a separate None option. One measured order cost 25 yen (5 + 5 + 15); this quote is not a universal price for all combinations.

The screenshots came from the user-supplied unpatched Japanese ROM in an isolated Snes9x runtime. For hidden items, valid inventory IDs were temporarily written into WRAM so the game itself rendered the selected item. No AI-generated art was used.

Sources and method

Six-area shops and practical equipment findings ↗
Purchase areas, gear choices, food effects and quest actions, with links to the original-ROM traces.

Original-ROM tool and quest actions ↗
All 23 general-tool records: selected-use handlers, event checks, inventory changes, capacity and decoded game messages.

Original-ROM equipment code ↗
Decoded records and traced consumers establish equipment compatibility. Unknown effects remain unresolved.

Original-ROM fish spawns and field maps ↗
Species/X/Y spawn tables and terrain loaded by the same ROM. Notebook overview artwork is not used for guessed pin placement.

ROM identity
Owner-supplied original Japanese ROM, 1,572,864 bytes; SHA-1 c2103dd94e2a1a65a495fc02adc2e7d040f31212. English/Thai explanations are website translations.